Sorted by Squirrels.

Saturday 3 September 2016

M5-Multi-II ... II

A couple of tweaks have reduced the size of the board by nearly 2 square inches, meaning that the medium run service from OSHPark is now feasible.


I just need to adjust the size of the printing on the front and move a capacitor so that the EEPROM socket doesn't foul on it but other than that I believe it's good to go!

Saturday 13 August 2016

Sord M5 - Multicart V2

Finally the ennui has passed and some time was devoted to seeing what I could rescue from the ashes of the original M5 multi-cart.


Long-time readers may remember this board from a few years ago now. It's a complicated little thing, with lots of chips and passives and switches and chips and passives and things. It was a pain to make and to top it all the failure rate was in the high 70%.

There were a number of factors that contributed to this situation and I dare say that I could probably get it working now that I've had some support and debugging help from a friend and fellow enthusiast - Bas at BetaGamma.

The main issue with the board was that the ROM images needed to be stepped through one-at-a-time by pressing the button on the front. It was a chore and the reset method I devised was at best unreliable.

What I really wanted was a menu-driven design which was simpler. So I came up with this.


Simple, eh!

Gone was the PIC microcontroller and its supporting hardware. Added was my CPLD of choice, a Xilinx XC9500XL series chip. 5V tolerant, and in my experience utterly bomb-proof.

The M5's cartridge slot contains a few signals which are very useful - IOWRITE and EXTIOB. The former is what you'd probably guess - asserted when an IO write is in progress by the Z80. The latter is a signal originating in the M5's memory controller custom chip, and is asserted when an IO access is made to a port in the range $70-$7f. Under normal circumstances nothing in the system writes to this IO port.

My plan was to watch for writes to one of the $7x ports and capture the data bus content. This would be used as a base page number for selecting any one of the 64 8K pages of rom in the multicart's EEPROM. Most of the M5's carts are 8k, with the exception of BASICs F & G, and FALC - the M5's spreadsheet.

The M5 has 3 ROM select lines on the cartridge slot. ROM1, ROM2 and EXT-ROM.

ROM1 selects 8k in the region $2000-$4000
ROM2 selects 8k in the region $4000-$6000
EXT-ROM selects 4K in the region $6000-$7000

The CPLD outputs 6 address lines used as bank selection on the EEPROM. The bank number output is a sum of the base bank number set by the Z80, and a 2 bit number formed by ROM2 and EXT-ROM being bit 0 and bit 1 respectively.

With this logic in place and a suitable menu program written and debugged using MESS, I finally had the multicart working that I'd originally imagined.

A fairly simple job of re-working the original schematic and board in EAGLE, another simple job of uploading the design to my favourite short-run fab-house and a final simple job of waiting for 2 weeks and here is the result:


Perfect. Purple.

I just need to sort out a manufacturer for a mid size run of boards then I'll be selling these.

Saturday 11 June 2016

Sea Dragon. SEA DRAGON!


There's always Sea Dragon.

Loading from SD card, natch. This time on a Video Genie.

Friday 10 June 2016

Feeding the Genie

The einSDein interface is quite versatile. At its connector it is simply a very basic set of Z80 bus and control lines.

RD, WR,IORQ, M1. A[0..7] and D[0..7].

So it shouldn't be hard to interface to other Z80-based computers, right?

Right!


Here is an issue 2 einSDein wired up to a Video Genie, the UK version of the popular TRS-80 clone made by the EACA corporation. It is variously known by other names such as the Dick Smith System 80, PMC-80, TRZ-80 and so on.

The expansion connector breakout was custom made one rainy afternoon, and while it looks a mess it does the business.

A small machine language program was written to perform a directory listing of the SD card. This was converted into a cassette image format, then loaded using PlayCAS.

Here is a video on arguably the best known video distribution channel in the western hemisphere. It shows the aforementioned program pulling a listing from the interface pictured above.

The more eagle-eyed may recognise that the programs on the card are not Genie programs. This is being attended to, dear reader. I have written a converter program which takes cassette image format files and spits out a raw-ish binary dump which can be loaded from SD card. It only works with 'system' or machine language programs at the moment, but a gander at the Level II ROM reference book will soon see to that restriction.

Armed with a copy of MAME and its fine debugger I will spend a few quality hours stepping through the cassette loading functions to see what I need to do in order to craft a work-alike in order to load BASIC from the SD card.

Wednesday 8 June 2016

Bit-ing the bucket. A tale of mixed metaphors.

I have a few Mercurial repositories in BitBucket that I wanted to convert to Git, after undergoing something of a conversion myself. After a lot of onlinesearchengining for automated solutions, and being disappointed with the amount of effort involved, I came up with a rather nifty way of doing this without having to install and configure the HG command line tools. Sure enough, the hggit plugin sounds very quick and convenient - assuming you have HG installed. My way is undoubtedly clunky and a bit of a hack, but that's the way I like it, baby!

I will assume that if you want to do this you have a BitBucket account already set up and you have, or will soon have, a GitHub account. The GitHub account is only used temporarily.

Step 0. BitBucket

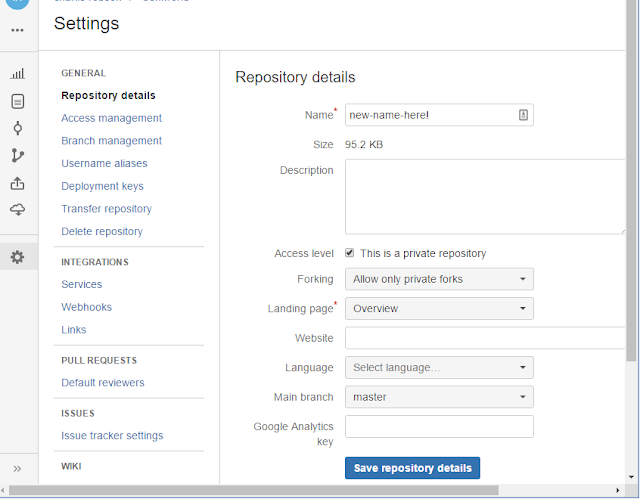
Rename the convertee BitBucket repo, unless you will give the new git-i-fied version a different name. Click the gear icon in the left hand panel on your repository details page to get to the repo settings page where this can be achieved.


Edit the repo name and click the large 'Save Repository Settings' button.


Step 1. GitHub.

Click on the '+' icon at the top right of your GitHub home page.
Select 'Import Repository'.


Enter the URL of the BitBucket repo you wish to convert.
Give a name to the GitHub copy. Choose anything, it won't live for long.
Begin the import by clicking the big green button.


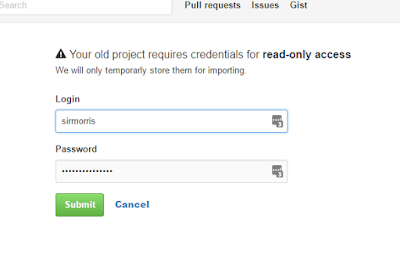
You may be prompted to enter your BitBucket credentials. GitHub will not store these.


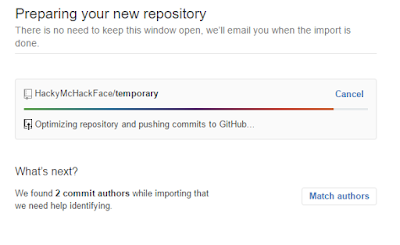
The repo will now be imported.
If there are questions about contributors, you can safely ignore them if you wish.


Step 2. BitBucket.

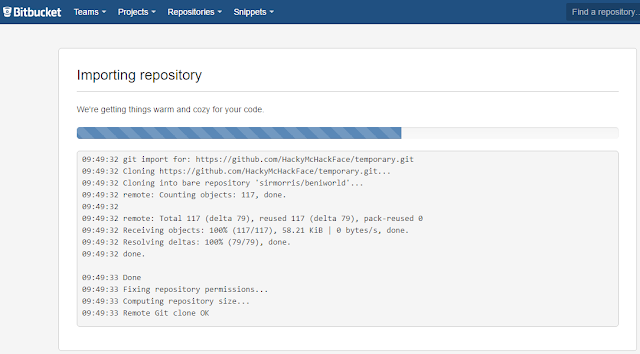
Select the Repositories button in the menu at the top of the page, and choose the Import option.
Enter the URL of the newly created GitHub repo.
Nominate a new name for the converted repo.
Click the 'Import Repository' button.


Machinations!


And that's it! This process has worked for me quite successfully on a number of projects.

May the Petits Fours be with you.

Friday 1 April 2016

Contact Form

Name

Email *

Message *

This is how we do it

MMC (9) acorn atom (7) zx81 (7) sord m5 (6) arduino (5) multicart (5) Sord (4) tatung einstein (4) Atari 800 (3) Chuckie egg (3) M5 (3) M5Multi (3) c128 (3) sd card (3) sd2iec (3) sio2sd (3) 6502 (2) Max6956 (2) QL (2) RCM (2) assembler (2) avr (2) c64 (2) cadsoft eagle (2) eeprom (2) einSDein (2) mmbeeb (2) multi-cart (2) spi (2) system 80 (2) ufat2 (2) vic20 (2) video genie (2) 6502 second processor (1) 6522 (1) 8255 (1) Acorn BBC Micro (1) Apple 2e (1) Apple ][ 2 two (1) BBC 6502 second processor (1) BBC micro (1) DevicePrint (1) Double Choc Chip Muffins (1) FAT (1) IO (1) Jupiter Ace (1) LED (1) Master 128 (1) PCB (1) PIC (1) POV (1) PROGMEM (1) Pineapple (1) ST (1) Spectrum 128 (1) antex (1) arcade spinner (1) arduino shield (1) atari (1) atmel (1) bakewell tart (1) beer (1) bird's nest (1) bitbucket (1) brokenated XC special (1) cake (1) cassette (1) cassette interface (1) colecovision (1) compact flash (1) convert (1) dac (1) de-yellowing (1) dev cart (1) eaca (1) efficient (1) einsdein. z80 (1) esp32 (1) esp8266 (1) eye strain (1) failosophy (1) filesystem (1) finally (1) fram (1) french polishing (1) fuse (1) fuses (1) games (1) gaming (1) github (1) glue (1) google chrome (1) heroic failure (1) high voltage programming (1) hot irons (1) if (1) jiffydos (1) joey beltram (1) lego robot (1) library (1) lying (1) machine code (1) matron (1) microcode (1) mmc interface (1) mmc2iec (1) mmm (1) mouse guts (1) oscilloscopes (1) pcm (1) pic32mx (1) porn (1) proto shield (1) purple (1) repo (1) retro computer museum (1) retro hard-on (1) rom box (1) sd (1) sd-x (1) sd2mmc (1) seadragon (1) silliness (1) small (1) software master (1) soldering (1) spi software master (1) stray capacitance (1) string (1) techadventure (1) test equipment porn (1) ts1000 (1) turtle cheesecake (1) tweaking (1) vc20 (1) video head (1) video ram replacement (1) weewee (1) wingasm (1) wire library (1) wodges of IO (1) xilinx cpld (1) yellowing (1) z80 (1) zx spectrum (1) zxpander (1)
Unless otherwise stated all of the original work presented here is:

Creative Commons License
Licensed under a Creative Commons Attribution-Noncommercial 2.5 Generic License.

The work of others where referenced will be attributed appropriately. If I've failed to do this please let me know.